Mind Over Pain

When everything hurts, the last thing on your mind is meditation and deep breathing. Meditation can be a great tool for easing pain and reducing overall stress because when you relax your mind and body, it releases endorphins - or “feel good” hormones. It’s also free, and the only side effects you’ll have to worry about are feeling better or possibly getting a good night of sleep.

Meditation doesn’t have to be this elaborate process with incense, candles, singing bowls, or the likes. It just requires peace, quiet, and a cozy spot at home.  

Find a comfortable position where you won’t be interrupted. Meditation can be done seated, laying down, or in any position that feels good to your body

You might find that you prefer dimmer lighting and a quiet space. Being comfortable is important. You might want to have a pillow or blanket nearby, but no special props are needed to meditate.

Start by meditating for just five minutes. You can use a timer to keep track or find short mindfulness or body scan meditations on YouTube or other apps. Practice meditating a few times a week to start, then work your way up to 15 or 20 minute sessions. During practice, when you notice your thoughts beginning to wander, redirect your attention back to your breathing.

Some healthcare providers also offer programs that incorporate mindfulness-based strategies along with massage, acupuncture, or nutritional services to help people cope with chronic pain. So, if you need help, don’t be afraid to ask your healthcare provider for alternatives.

Healthy Holiday Snack Mix

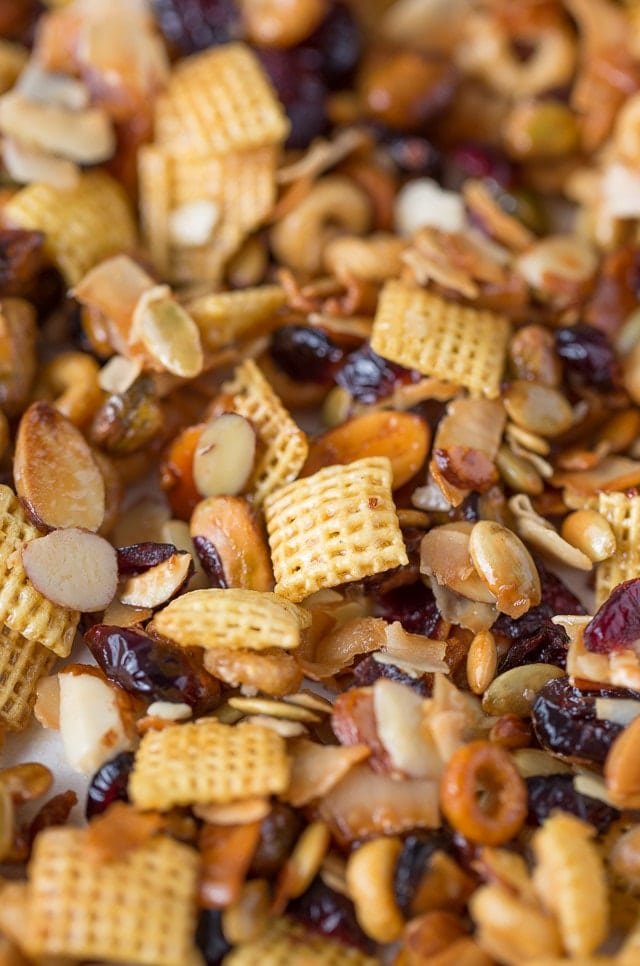
‘Tis the season for presents, magic, family, and lots of treats! Christmas can be the hardest time of the year to stick to a healthy diet with all of the yummy sweets around. Having healthy, alternative snacks & treats around the house can help curb some of those sweet temptations. This healthy holiday snack is a great alternative to a traditional dessert! One of our favorite things about this snack mix is that you can interchange the ingredients to match your taste preferences! We hope you love this easy snack mix as much as we do!

Our favorite way to make this snack:

Ingredients

  • 1 cup coconut flakes

  • 1 cup pumpkin seed kernels

  • 2 cup cereal (like Bran Chex)

  • 1 cup cereal, Cheerios

  • 1 cup almonds, sliced

  • 1 cup cranberries, dried

  • 1 cup pistachios, shelled

  • 1/4 cup coconut oil

  • 2/3 cup honey

  • 1/2 teaspoon salt

  • 1/2 teaspoon almond extract

  • 3/4 teaspoon cinnamon

Instructions

  • Preheat your oven to 350 degrees and line a large roasting pan with parchment paper. The glaze on this chex mix hardens, so you don’t want it to stick to your pan!

  • Combine coconut, pumpkin seeds, Chex, Cheerios, almonds, cranberries and pistachios in your pan.

  • In a small pan, melt coconut oil, honey, salt, almond extract and cinnamon together.  Pour over ingredients in your pan and stir until coated.

  • Bake for 5 minutes, stir pan and then bake for 5-7 more minutes.

  • Let cool and then break apart and serve!

Mom Strength

You’ve heard of the term “mom strength” before, but do you know how much back pain moms go through on a day-to-day basis? From carrying kids, groceries, and everything in between, being a mom is quite the feat. So how can moms use their strength more wisely to try to avoid back pain? Mom, Stephanie Kutchback, Neurosurgical Nurse Practitioner with Piedmont Athens Neurosurgery, has some great tips to help moms continue being superheroes, while also saving their backs. Here are her top 3 tips to alleviate back pain:


  • Engage your core muscles 

Weak abdominal muscles can cause lower back pain by encouraging a forward-leaning posture and less stability when doing spinal motions. Since abdominals work in conjunction with back muscles when bending, straightening, or lifting, you could be more prone to back pain with a weak core. Planking and crunches are two great exercises to help engage and strengthen your core muscles.

  • Bend with your knees, not your back

Moms are constantly bending over to change diapers, play with baby, change baby’s clothes, picking up & putting down baby, the list goes on! A crucial tip for saving your back when bending over frequently is to make sure that you’re bending with your knees, and not your back. When you’re bending over, try to do so in more of a squat position, rather than leaning into a 90 degree position with your back. Doing this will also ensure that you don’t blow a disc from lifting and bending improperly.

  • Using a backpack diaper bag

Diaper bags come in all different shapes and sizes. From over the shoulder, to backpack, to purse styles, choosing one that’s better on your back can be overwhelming. We recommend a diaper bag that fits like a backpack. Having this style of diaper bag will more evenly distribute the weight across your back, rather than carrying it all on one shoulder. It is also recommended that you don’t overfill your bag causing it to be too heavy. Even a diaper bag with weight that’s evenly distributed across your back can still cause back pain and forward-leaning posture if it’s too heavy.


To sum it up, we think moms are superheroes. Let’s face it, being a mom isn’t easy. The strength it takes to be a mom is unmeasurable. We hope our tips help save you from back pain. Don’t forget you can always reach out to us here at Piedmont Athens Neurosurgery if you ever need us!

Driving Safety Tips

Many people travel more during the summer. Whether you’re going to a beach, to visit family & friends, or just going to work or running errands, you’ll see an increase in traffic. It’s important to always be safe when driving. Here’s our top 8 tips for staying safe:

Wear a seatbelt

  • The lap belt and shoulder belt should be secured across the pelvis and rib cage.

  • Place the shoulder belt across the middle of your chest and away from your neck.

  • The lap belt rests across your hips, not your stomach.

  • NEVER put the shoulder belt behind your back or under an arm.

Adjust the headrest to appropriate height

  • Headrests should be positioned two inches or less from the rear of the driver's head, and never more than four inches.

  • When adjusting for height, the bulk of the headrest should stand directly behind the driver's head, at ear-level.

Avoid distracted driving

  • Stay off of cell phones & electronics

Proper distance from the steering wheel

  • The National Highway Traffic Safety Administration and the Insurance Institute for Highway Safety reports that roughly 10 inches or further is an optimal distance between a driver and their steering wheel, due to the amount of power that an airbag can produce when it deploys.

Placing hands in lap at red light / Relax your body when driving

  • You’re less likely to stiffen up when getting rear ended because most of the time you don’t know it’s coming. The airbags come out fast enough to break your forearms.

  • Relax with a gentle bend in the elbow. Or consider using the arm rests on either side of you to help take the load off your shoulders and spine.

Don't put feet on dash

  • Putting your feet on the dashboard is dangerous and potentially fatal. Upon impact passenger airbags are deployed from inside the dashboard and if your feet are up at the height of the dash, your legs will be pushed upward rather than keeping your legs and lower body secured in a seated position.

Slow down

  • Posted speed limits apply to ideal conditions. It's your responsibility to ensure that your speed matches conditions. In addition, higher speeds make controlling your vehicle that much more difficult if things go wrong. It also takes longer to come to a safe stop at a higher rate of speed.

Be aware of your surroundings

  • Check your mirrors frequently and scan conditions 20 to 30 seconds ahead of you. Keep your eyes moving. If a vehicle is showing signs of aggressive driving, slow down or pull over to avoid it. If the driver is driving so dangerously that you're worried, try to get off the roadway by turning right or taking the next exit if it's safe to do so. Also, keep an eye on pedestrians, bicyclists, and pets along the road.

Not in the Pharmacy, but the fridge!

It’s no secret that back pain and inflammation affect many of us daily. What many don’t realize,

though, is that the food we consume can contribute to chronic back pain and inflammation.

Fortunately, we can combat this by making healthier food decisions. In order to help fight

against inflammation and back pain, the team at Piedmont Athens Neurosurgery has carefully

created a list of our top 5 foods to incorporate into your diet.

1. Fruits and vegetables

While incorporating fruits and vegetables into our diet is overall good for our health,

there are some anti-inflammatory options that can tremendously cut down on chronic

back pain. Tomatoes, strawberries, blueberries, cherries, apples, oranges, and leafy

greens are some of the best anti-inflammatory foods because they are all high in natural

antioxidants.

2. Fatty fish

Fatty fish such as salmon, mackerel, tuna, and sardines are great options for reducing

inflammation that can lead to back pain. These types of fish contain a high amount of

Omega-3 fatty acids, and can help improve blood flow to your back.

3. Nuts

Almonds, walnuts, and cashews contain good fats and other nutrients that are important

for anyone trying to live a healthy lifestyle. These nuts are high in alpha linoleic acid

(ALA), magnesium, and vitamin E, which help keep inflammation causing back pain

under control. One serving of nuts a day can increase anti-inflammatory proteins while

lowering inflammation-causing molecules.

4. Drinks

Coffee and green tea are two great options to include in an anti-inflammatory diet.

Coffee is also rich in antioxidants and can lower your risk of other conditions like type 2

diabetes, heart disease, and certain types of cancer.

5. Spices and seasonings

Some cooking spices and seasonings can also help to reduce back pain. We suggest

adding basil, cinnamon, and turmeric to your diet. Each one has anti-inflammatory

properties that can help you live a more active life with less back pain and inflammation.

These are just a few of the anti-inflammatory foods that can help with back pain. Piedmont

Athens Neurosurgery is here to help you learn more about how we can help alleviate your back

pain with non-surgical options.

Summer Snack Competition - Round 1

Summer is here and so is our Summer Snack Competition featuring healthy snacks prepared by our wonderful Piedmont Athens Neurosurgery staff.


Round 1 winner is Nina, our front office assistant, for her fresh, homemade guacamole.
Here’s her recipe:

  • 5 Avacados

  • 1 Roma Tomato

  • 1/2 Cup Red Onion

  • 1/2 Cup Cilantro

  • 1/2 tbsp McCormick’s Total Seasoning

  • 3 Limes, Squeezed

  • Salt to Taste

  • Serve with Corn Chips or Veggie Straws

Judges notes: “Nina’s Guacamole was so fresh and flavorful. It has a smooth texture yet kept a few chunks of avocado for a nice, creamy taste. And…the McCormick’s was a nice touch. Added a little kick to the dish. I’d honestly eat it without chips. Just pass the spoon.”

Tasty Pita Pizza

Who says pizza has to be unhealthy? Check out this recipe for a delicious and healthy pita pizza.

Individual pizzas are perfect for a party or group. Each person gets to custom make their pizza with toppings of their choice. And, pita rounds are the perfect size for individual pizzas. Simple to make, toss them on the grill or pop them in the oven until the cheese is bubbly and golden brown. Pita pizzas are the perfect quick-and-easy dinner for busy weeknights. Add your own veggies, try different cheeses, or make up a new sauce!

Ingredients: (serves 1, 405 calories)

  • 1 pizza round

  • 1 tsp olive oil

  • 1/8 tsp garlic salt

  • 3 tbsp pizza sauce

  • 1/2 cup shredded mozzarella

  • 1/4 cup sliced mushrooms

Directions:

  • Heat grill to medium heat.

  • Spread oil and pizza sauce onto one side of pita round.

  • Top with cheese and mushrooms (or other vegetables).

  • Season with garlic salt.

  • Add to grill and cover. Cook until cheese is melted (about 5 minutes).

ABS_Recipe_pizza.jpg

Quick Peachy Oatmeal

Need an easy recipe for those rushed mornings? Indulge in this tasty and nutritious peachy oatmeal.

This peachy oatmeal will remind you of a peach crisp. Quick and easy to make in the morning for breakfast. Substitute honey or stevia for sugar to reduce calories. Also, coconut or almond milk can replace regular milk for those with intolerances and/or water to give it more flavor.

Ingredients: (serves 1, 411 calories)

  • 1/2 (15 oz) can peaches, drained

  • 1/2 cup water

  • 1/2 cup milk

  • 1/2 cup quick-cooking oats

  • 2 tablespoons packed brown sugar

  • 1/4 teaspoon ground cinnamon, or more to taste

  • pinch of salt, optional

Directions:

  • Cut peaches into chunks.

  • Stir peaches, water, milk, oats, brown sugar, cinnamon, and salt together into a microwave-safe bowl.

  • Cook in microwave on High, stirring every 60 seconds, until the oats are softened, about 3 minutes.

  • Stir one final time before serving.

ABS_Recipe_oatmeal.jpg

Rich Filet Mignon

A classic and a healthy option for two. Whip up this delicious, low sodium steak with a side salad.

This is an elegant and romantic dinner for two. Served with steamed asparagus and a crisp side salad for a healthy dinner for two.

Ingredients: (serves 2, 367 calories)

  • 2 (4 ounce) filet mignon steaks

  • 1/4 cup balsamic vinegar

  • 1/4 cup dry red wine

  • 1/2 teaspoon freshly ground black pepper

  • salt to taste

Directions:

  • Sprinkle freshly ground pepper over both sides of each steak, and sprinkle with salt to taste.

  • Heat a nonstick skillet over medium-high heat.

  • Place steaks in hot pan, and cook for 1 minute on each side, or until browned.

  • Reduce heat to medium-low, and add balsamic vinegar and red wine.

  • Cover and cook for 4 minutes on each side, basting with sauce when you turn the meat over.

  • Remove steaks to two warmed plates, spoon one tablespoon of glaze over each, and serve immediately.

ABS_Recipe_steak.jpg

Crunchy Chicken Fingers

Chicken fingers – a true crowd favorite. And they're gluten free! This quick recipe is sure to please.

Chicken fingers with a crunchy chip coating. Very easy to make. And by using corn chips, they are naturally gluten free!

Ingredients: (serves 6, 474 calories)

  • 2 pounds skinless, boneless chicken breast - cut into strips

  • 2 eggs, beaten

  • 1/2 cup milk

  • 1 (12 ounce) package tortilla chips, crushed

Directions:

  • Preheat oven to 400 degrees F (200 degrees C).

  • Mix egg beat and milk in a shallow dish or bowl.

  • Place crushed chips in a separate shallow dish or bowl.

  • Dip chicken first in egg mixture, then in crushed chips to coat. Place coated chicken on an ungreased cookie sheet.

  • Bake in preheated oven for 10 minutes; turn chicken over and bake for another 10 minutes.

ABS_Recipe_chicken.jpg

Technology Leading to Rise in Carpal Tunnel Cases?

Carpal Tunnel Syndrome (CTS) is a very common condition seen in our practice when patients start to experience tingling and numbness of the hands. While we used to see this condition mostly in people operating heavy machinery and working with highly repetitive motions on assembly lines,the increased usage of technology such as computers, tablets, and smartphones has led to increasing cases of carpal tunnel from a wider variety of sources. 

What is Carpal Tunnel? 
Carpal Tunnel Syndrome is caused by an overgrown ligament at the base of the thumb-side of the hand, which compresses the nerve and results in a sore thumb joint (among other symptoms). People with carpal tunnel will experience tingling and numbing sensations, but only in the first three digits of their hands (thumb, forefinger and middle finger). These carpal tunnel symptoms can even cause restless sleep. We often see patients describing themselves waking up at night due to these sensations and shaking their hand out to regain feeling that does not fully return. 

Can Technology Use Really Cause Carpal Tunnel? 
While there are many causes of carpal tunnel, constant and repetitive hand movements are most often the culprit. The swiping, typing, and gaming movements used with phones and computers require our fingers to stretch and flex to unnatural positions. With heavy repetition over time, these actions can lead to swollen tendons in the carpal tunnel, resulting in median nerve pressure. Continued pressure on the median nerve can lead to carpal tunnel down the line. 

The technology era has seen more and more children growing up using computers, playing video games and walking around with phones glued to their hands. As a result, we are seeing more carpal tunnel cases come through the doors as these children grow up and the ligament damage begins to show signs of its effects. 

Treatment 
Carpal Tunnel Syndrome can be treated in many ways. Simple splinting at night can go a long way to give the median nerve the rest that it needs to recover from the swelling and inflammation. If you can catch it early, Carpal Tunnel Syndrome may resolve without surgery or other medical attention beyond a splint. 

If surgery is needed, the operation is minimally invasive and recovery time is relatively quick. Even some surgeons who have had the condition themselves have returned to practice after only 12 days post-surgery. Carpal tunnel is treatable, and the surgery is not something to be afraid of. 

Prevention 

  1. Since technology isn’t going anywhere, there are several ways you can be proactive against Carpal Tunnel Syndrome that are directly related to technology usage.

  2. When using a computer, sit properly with your elbows by your sides, and your wrists straight and at the same height as the keyboard (not raised up or bent).

  3. Take breaks. If you are playing a game on your phone or computer, make sure to give your hands a break from the repetitive motions required to play.

  4. Stretch and strengthen. Flex and extend your wrist and fingers to reduce stress and strain on this area.

  5. Knowing what can potentially lead to Carpal Tunnel Syndrome and taking actions to prevent it can help you avoid this peripheral nerve injury that appears to be on the rise.

Healthy Thanksgiving Recipes

During the holidays, it’s hard to maintain healthy eating habits. With all the delicious temptations, it’s easy to get off track. We have found a few holiday recipes that look and taste delicious, but are healthier versions. Everyone should be able to enjoy their holiday favorites. Enjoy your holiday guilt-free with these recipes. 

green bean casserole.png

Healthy Green Bean Casserole- Green Bean Casserole is one of the most popular sides at Thanksgiving and Christmas. Did you know that most green bean casserole recipes contain canned soup and fried onions which are very high in fat and sodium. With the version below, you are eliminating those processed, high sodium and fat components, but still incorporating ingredients that give it amazing flavor. 

Ingredients:

  • 2½ pounds green beans, trimmed and cut into 1- to 2-inch pieces (about 8 cups)

  • 2-3 tablespoons extra-virgin olive oil, divided

  • 1 medium onion, thinly sliced

  • 3 tablespoons all-purpose flour

  • ¾ teaspoon salt

  • ¼ teaspoon white or black pepper

  • 2½ cups low-fat milk

  • 1½ cups fresh whole-wheat breadcrumbs (see Tips) or ½ cup shredded or crumbled cheese

Preparation:

  1. Position racks in upper and lower third of oven; preheat to 425°F.

  2. Toss green beans in a large bowl with 1 tablespoon oil until well coated. Divide between 2 baking sheets and spread in an even layer. Roast, stirring once and rotating the pans top to bottom about halfway through, until tender and beginning to brown, 20 to 25 minutes.

  3. Meanwhile, heat 1 tablespoon oil in a large saucepan over medium heat. Add onion and cook, stirring frequently, until very soft and golden brown, 5 to 8 minutes. Add flour, salt and pepper; cook, stirring, for 1 minute more. Add milk and continue to stir, scraping up any browned bits. Cook, stirring, until the sauce bubbles and thickens enough to coat the back of a spoon, about 4 minutes. Remove from the heat. (See Tips)

  4. When the green beans are done, remove from the oven. Preheat the broiler.

  5. Transfer half the green beans to a 2-quart, broiler-safe baking dish. Spread half the sauce over the green beans. Add the remaining green beans and top with the remaining sauce.

  6. Combine breadcrumbs and the remaining 1 tablespoon oil in a small bowl (skip this step if you are topping with cheese).

  7. Sprinkle the breadcrumb mixture (or cheese) over the gratin. Place under the broiler and broil, watching closely, until the gratin is bubbling and beginning to brown on top, 1 to 5 minutes, depending on your broiler. Let stand for 10 minutes before serving.

  • Make Ahead Tip: Roast green beans (Step 2) up to 30 minutes ahead. Prepare the sauce (Step 3), cover and refrigerate for up to 1 day; gently reheat until steaming before combining with the green beans.

  • Tips: To make your own fresh breadcrumbs, trim crusts from whole-wheat bread. Tear bread into pieces and process in a food processor until coarse crumbs form. One slice of bread makes about ½ cup fresh breadcrumbs.

  • To add extra flavor to the cream sauce, at the end of Step 3 stir in 1 tablespoon chopped fresh herbs, such as thyme, sage or parsley. Or make it cheesy by stirring in ½ cup shredded or crumbled cheese, such as Gruyère, Swiss, Cheddar or blue cheese.

  • Keep food fresh: If you're storing food in your fridge for a few hours or more, it's best to keep it in an airtight container or in a container covered tightly with foil. Foil is best at creating a barrier that doesn't let unwanted flavors in (or out) while you store your food.

pumpkin pie.png

Light Pumpkin Pie- The holidays are never complete if you don’t indulge in pumpkin pie. While pumpkin pie is generally healthier than other pies, it still isn’t a great option. The pumpkin component in the pie is pretty healthy itself, but when you add in all the cream, butter, and sugar, the healthy component is definitely outnumbered. The recipe below reduces the amount of fat and sugar in the pie. Top it off with some frozen light whipped topping to decrease the amount of sugar and fat as well. 

Ingredients:

  • Oil Pastry

    • 1⅓ cups all-purpose flour

    • ¼ teaspoon salt

    • ⅓ cup cooking oil

    • 3 tablespoons fat-free milk

  • Pumpkin Filling

    • 1 (15 ounce) can pumpkin

    • ⅓ cup sugar or sugar substitute equivalent to ⅓ cup sugar

    • 2 tablespoons honey

    • 1 teaspoon ground cinnamon

    • ¼ teaspoon ground ginger

    • ¼ teaspoon ground nutmeg

    • ½ cup refrigerated or frozen egg product, thawed, or 2 eggs, slightly beaten

    • 1 teaspoon vanilla

    • ¾ cup evaporated fat-free milk

    • Frozen light whipped dessert topping, thawed (optional)

Preparation:

  1. To prepare pastry: Stir together flour and salt in a medium bowl. Add oil and milk all at once to the flour mixture. Stir lightly with a fork. Form into a ball.

  2. Preheat oven to 450°F. On a well-floured surface, use your hands to slightly flatten the dough; roll from center to edge into a circle about 12 inches in diameter. To transfer the pastry, wrap it around the rolling pin. Unroll the pastry into a 9-inch pie plate. Ease the pastry into the pie plate, being careful not to stretch. Trim the pastry to ½ inch beyond the edge of the pie plate. Fold under the extra pastry; flute or crimp edge as desired. Do not prick. Line the pastry with a double thickness of heavy foil. Bake for 8 minutes. Remove the foil. Bake for 5 minutes more. Cool on a wire rack while preparing the filling. Reduce oven temperature to 375°F.

  3. To prepare filling: Combine pumpkin, sugar, honey, cinnamon, ginger and nutmeg in a medium bowl. Add egg and vanilla. Beat lightly with a fork just until combined. Gradually stir in evaporated milk.

  4. Pour the filling into the baked pastry shell. To prevent overbrowning, cover the edge of the pie with foil. Bake until the filling appears set, 40 to 45 minutes (the edges of the filling may crack slightly).

  5. Cool completely on a wire rack. Cover and refrigerate within 2 hours. If desired, serve with dessert topping.

  • Tips: If using a sugar substitute, we recommend Splenda® Granular or Sweet 'N Low® bulk or packets. Be sure to use package directions to determine product amount equivalent to ⅓ cup sugar. Nutrition Facts per serving with sugar substitute: 171 cal., 8 g total fat (1 g sat. fat), 1 mg chol., 108 mg sodium, 22 g carbo., 2 g fiber, 5 g pro.

sweet potatoes.png

Maple Roasted Sweet Potatoes- Sweet potatoes are much better than regular potatoes in itself. What makes sweet potatoes go down hill is the amount of sugar, butter, and marshmallow that covers the popular holiday dish. The recipe below is a lower-calorie and low-sodium option with amazing flavor. It’s also an easy dish to throw together if you don’t want to spend too much time in the kitchen. 

Ingredients:

  • 2½ pounds sweet potatoes, peeled and cut into 1½-inch pieces (about 8 cups)

  • ⅓ cup pure maple syrup

  • 2 tablespoons butter, melted

  • 1 tablespoon lemon juice

  • ½ teaspoon salt

  • Freshly ground pepper, to taste

Preparation:

  1. Preheat oven to 400°F.

  2. Arrange sweet potatoes in an even layer in a 9-by-13-inch glass baking dish. Combine maple syrup, butter, lemon juice, salt and pepper in small bowl. Pour the mixture over the sweet potatoes; toss to coat.

  3. Cover and bake the sweet potatoes for 15 minutes. Uncover, stir and cook, stirring every 15 minutes, until tender and starting to brown, 45 to 50 minutes more.

  • Make Ahead Tip: Cover and refrigerate for up to 1 day. Just before serving, reheat at 350°F until hot, about 15 minutes.
    Part of the holiday fun is eating all the delicious foods. Substituting ingredients in your favorite dishes still makes them enjoyable. Plus, it makes it a guilt-free indulgence. Be mindful of all the foods you’re eating during those holiday get-togethers and always remember that things are okay in moderation and portion control. Happy Holidays from your family at Athens Brain and Spine! 

*Recipes from eatingwell.com

Learn to Love Your Core

A FREE CORE EXERCISE CLINIC

Coreblend Training and Wellness

Location: 1260 Greensboro Hwy, Watkinsville, GA

Date: October 13, 2018

Time: 10AM-12PM

Registration required: Email Stephanie.smith@piedmont.org, call (706) 475-1870, or stop by the office for forms.

Work Out With Your Neurosurgery Team!

Have you ever wondered what we mean when we say "a strong core?" The ultimate tool to a good spine health and an active lifestyle at every age.

Join Drs. Walpert and Patil and their staff to learn some new exercises, brush up on old ones, and adapt them to our current needs. Enjoy a fun group setting with individual attention from Coreblend's expert training staff. Round out the morning with hints for nutritional snacks and meals, with recipes and tips from Coreblend's wellness staff. 

All fitness levels welcome- we are all in the same boat here!

All participates will recieve a free t-shirt, first 20 registrants will recieve a special gift.


See what others are saying about the Learn to Love Your Core Exercise Program:


“IN AUGUST 2016, I HAD SPINAL SURGERY TO CORRECT A RUPTURED DISC. AFTER GETTING THE ‘ALL CLEAR’ I DECIDED MY HEALTH NEEDS TO BE MORE OF A FOCUS. I NEEDED TO MAKE SOME CHANGES. I KNEW I WANTED A TRAINER TO WORK WITH ME. SOMEONE WHO COULD DEVELOP A PLAN OF ATTACK TO HELP ME WITH MY FITNESS GOALS, WHILE AT THE SAME TIME KEEPING MY BACK ISSUE IN MIND. I VISITED CORE BLEND AND MET COREY DAVIS. COREY AND THE CORE BLEND TEAM KNOW WHAT THEY ARE TALKING ABOUT AND THEY KNOW HOW TO HELP YOU ACHIEVE YOUR FITNESS GOALS. SINCE MY SURGERY, I’M DOWN ALMOST 40 LBS. I CAN DEADLIFT MY ORIGINAL BODY WEIGHT FOR 3 SETS OF 5. MY KNEES FEEL THE BEST THEY HAVE FELT IN YEARS. I BECAME THE 30TH MALE AT THE GYM TO ROW A SUB 7 MINUTE 2K METER ROW. BUT MOST IMPORTANT TO ME, NOT ONE ISSUES WITH MY BACK!”

-JEFF JONES

“I HAD A CERVICAL FUSION OF C-6 AND C-7. I WAS IN A HALO FOR 4 MONTHS, NECK BRACE FOR 4 MONTHS, SURGERY AND THEN BACK INTO A NECK BRACE AGAIN FOR ALMOST A YEAR. THEY DAY I GOT OUT OF MY NECK BRACE I WENT TO EAT SPAGHETTI AND MY FACE FELL IN MY PLATE BECAUSE MY NECK WAS SO WEAK. BABY STEPS, HARD WORK, AND FAITH, IT COMES BACK. THE BIGGEST THING ABOUT MY RECOVERY WAS MY MINDSET. IT’S VERY FRUSTRATING TO TAKE A LOT OF STEPS BACKWARDS PHYSICALLY AND NOT BE ABLE TO DO ANYTHING ABOUT IT. IT’S A DAILY PURSUIT OF GETTING BETTER AND WORKING ON YOUR STRENGTH. IT’S NOT WHERE YOU WERE, IT’S ABOUT WHERE YOU ARE GOING. DOMINATE EVERY DAY." 

- DAVID POLLACK

Dr. Patil Helps Woman Stand Up Straight Again And Get Her Life Back

Mary Ann Rivers has struggled for years to sit up straight. After being diagnosed with breast cancer in 2015 and going through chemo and radiation, the bones and muscles in her back became too weak to hold up her neck straight.

Dr. Patil stepped in to help. After examining and meeting with her, he learned that she was experiencing dangerous effects from the weakened bone and muscles in her back. She was struggling to swallow and breathe. Dr. Patil knew that something had to be done or she might lose her life.

The surgery took about nine hours. Dr. Patil was able to release the muscles pulling Rivers’ head downward. He was also able to remove calcifications and straighten her spine, fusing 11 vertebrae. On top of the complicated surgery, Rivers also has Parkinson’s disease which makes it harder for the spine to heal correctly.

Rivers said when she found out that Dr. Patil was going to be able to operate on her, she got emotional. She was excited that the misery could potentially be over.

After a few months of recovery, Rivers is sitting up straight and is wearing a brace. Dr. Patil is very proud of her progress and is happy that he could help save her life.

Finding Time to Get Outdoors with a Full Schedule

Exercising is a crucial part of staying in shape, but finding room in a busy schedule already filled to the brim with work and kids can be enough of a challenge in itself. How are we supposed to add another item to our ever-growing todo lists?

The key is multitasking; if you find inventive ways to get outside and get moving, you can accomplish other tasks simultaneously, saving you time and keeping you active! We suggest finding ways to get outdoors that involves the whole family.

One of the simplest ways to get out an exercise: head outside and take a walk! Take your kids, friends, or even your dog and go! You don’t have to go anywhere special. If you are crunched for time, just walk around your neighborhood and use it as time to catch up and chat about your day or to gather your thoughts and plan out your week.

If you have a little more free time, take a trip to one of your local parks. If you have a dog, look for one with a dog park or pet exercise area. Bring a yoga mat and get a session in while your kids play on a playground, or take a jog around the area together. There are endless options! You could even take some snacks with you and help your kids with homework outside after taking a walk through the park. Adjust your exercise schedule to meet your life’s many demands, and you can efficiently accomplish many things while getting much needed exercise and relief from day-to-day life.

Really wanting to get outside and take some time to focus on your health? Pack some water and snacks and hike a trail. There are trails for every level of experience, so don’t let it intimidate you! If you are just starting, pick a short trail with moderate terrain. If you are more experienced and feel like getting some exercise, find a more difficult trail on or near a mountain. The hard work will be worth the view! Take family and friends with you and make a day out of exploring a new place and taking some time to clear your head.

If you are really pressed for time, don’t worry; there are still plenty of things you can do. Head to your backyard and play with your dog for a little while, or do some yoga in the morning for a few minutes before you get ready for work.

The most important thing is that you get outside and exercise in a way that’s fun for you and works with your schedule.

Eating These Foods Could Help Lower Your Blood Pressure

Exercise and healthy habits can help lower your blood pressure—and so can these foods!

1. Reds - Beets and Berries

Beets are high in nitric oxide which opens blood vessels and lowers blood pressure. Berries are rich in flavonoids which helps lower blood pressure.

2. Leafy Greens

Leafy greens high in potassium helps your kidneys flush out sodium which helps reduce blood pressure. Stick to fresh or frozen varieties of kale, arugula, romaine, spinach, swiss chard, turnip greens, beet greens, or collard greens.

3. Bananas

Bananas are rich in potassium which helps your kidneys flush out sodium. Try a sliced banana in your morning oatmeal for a high fiber, low sodium breakfast.

4. Fish with Omega-3s

Not only is fish a great source for lean protein, fatty fish like salmon or mackerel are high in omega 3 fatty acids. These fatty acids can lower blood pressure, reduce inflammation, and lower triglycerides.

5. Pistachios

Eating a handful of pistachios is a great way to help reduce blood pressure. Pistachios reduce blood vessel tightening and heart rate.

Pool and Diving Safety for Kids

The return of summer weather means it’s time for family pool days. However, it’s important to be thinking of pool safety.

Nothing can replace supervision when kids are in the water. Young children should always be under adult supervision, and older children should swim with a partner. Enrolling children in beginner swimming lessons is a great way to make them more comfortable in the water.

Children should be able to tread water for one minute, find a safe exit, swim 25 yards, and be able to exit without using a ladder before they are considered a proficient swimmer. Emergency skills like basic water rescue skills and CPR are crucial to help a drowning child.

When considering pool safety for kids, one of the biggest risks for children and adolescents is diving. Diving can result in serious, life-threatening injuries. Divers who hit the side or bottom of a swimming pool can suffer from quadriplegia, otherwise known as being paralyzed below the neck. More than 40 percent of spinal injuries caused by diving occur in backyard pools so it’s important to know the proper pool safety precautions.

Before diving, make sure that the water’s depth is more than twice your height. It’s a simple task, and you’ll be glad you took the time to check instead of risking a diving board injury. Follow these diving tips and stay safe this summer.

Diving Safety Tips:

1. Wait until other swimmers leave the diving area
2. Only one person should be on a diving board at a time
3. Never dive into the shallow end of a pool
4. Keep the diving area clear of pool equipment and toys
5. Only dive off of the end of the diving board, don’t dive off of the side.
6. Do not try running dives, bounce only once on the board.
7. Don’t hang off of the board
8. Enroll in a diving class to learn how to safely dive
9. Don’t try to dive through toys
10. Never dive head-first down a slide

Help Lower Your Blood Pressure With These Drinks

High blood pressure seems to be on the rise. Whether it is diet, lack of exercise, stress, or hereditary factors, changing what you drink might help lower blood pressure. Studies have found that drinking these three beverages could help lower your blood pressure.

1. Hibiscus Tea

Anthocyanins and other antioxidants in hibiscus tea may work together to keep blood vessels resistant to damage that causes them to narrow. Many herbal tea blends contain hibiscus, which brews up bright red and delivers a tart flavor. Hibiscus has a tiny sweetness to it but you can add a little honey or stevia to make it sweeter if it is too tart for your taste buds.

2. Reds

Reds, what you ask? Beet, pomegranate, cranberry, and wine (red) are all helpful in lowering blood pressure. These reds help with circulation and cranberries help reduce vessel damage. While red wine has great health properties, the more you drink, the more you increase your risk of developing alcohol-related health issues. To be on the safe side, doctors recommend no more than two glasses of red wine per day for men and one glass per day for women.

3. Milk

Studies have shown that high blood pressure is linked to calcium deficiency. Naturally, the more calcium you consume, the more you decrease your risk for developing high blood pressure based on a lack of calcium. To get the best blood pressure benefits, you want to choose milk that is higher in calcium and lower in fat. For that reason, low-fat milk is the way to go. And, if you are lactose intolerant there is a great alternative for you. Unsweetened almond milk that has been fortified with calcium is a good low-fat milk substitute to help lower blood pressure.

Summertime Grilling Recipes

gallery-1464125618-delish-bbq-grilled-chicken_0.jpg

1. BBQ Grilled Chicken

Ingredients

2 c. bbq sauce

2 tbsp. honey

Juice of 1 lime

1 tbsp. Hot sauce

1 lb. boneless skinless chicken breasts and drumsticks

extra-virgin olive oil

kosher salt

Freshly ground black pepper

Directions

  • Make Sauce: In a large bowl, whisk together BBQ sauce, honey, lime juice and hot sauce. Reserve 1/2 cup for serving.

  • In a large bowl, toss chicken with olive oil and season with salt and pepper.

  • When ready to grill, heat grill to high. Add chicken, then baste with marinade and grill until charred, 8 minutes per side for breasts, and 10 to 12 minutes per side for legs.

Recipe via: Delish

landscape-1464203296-delish-grilled-salmon-lemon-butter.jpg

2. Lemony Grilled Chicken

Ingredients

4 6-oz. skin-on salmon fillets

Extra-virgin olive oil, for brushing

kosher salt

Freshly ground black pepper

2 lemons, sliced

2 tbsp. butter

Directions

  • Heat grill to high. Brush salmon with oil and season with salt and pepper. Add salmon and lemon slices and grill until salmon is cooked through and lemons are charred, 5 minutes per side.

  • Add a pat of butter to salmon right when it’s off the grill and top with grilled lemons. Serve. 

Recipe Via: Delish

gallery-1464905166-delish-foil-pack-tilapia.jpg

3. Honey Lime Tilapia

Ingredients

4 fillets tilapia

2 tbsp. honey

4 limes, thinly sliced

2 ears corn, shucked

2 tbsp. fresh cilantro leaves

1/4 c. extra-virgin olive oil

kosher salt

Freshly ground black pepper

Directions

  • Heat grill to high. Cut 4 sheets of foil about 12" long.

  • Top each piece of foil with a piece of tilapia. Brush tilapia with honey and top with lime, corn and cilantro. Drizzle with olive oil and season with salt and pepper.

  • Grill until tilapia is cooked through and corn tender, about 15 minutes.

 Recipe Via: Delish

landscape-1440699104-shrimp-kebab-delish.jpg

4. Pesto Shrimp Skewers

Ingredients

1 lb. medium or large frozen shrimp, deveined, thawed

3 lemons, thinly sliced

8 skewers, soaked in water 20 minutes

Extra virgin olive oil, for drizzling

kosher salt

Freshly ground black pepper

1/2 c. pesto

Directions

  • Preheat grill to medium-high. Skewer shrimp and lemon slice. Drizzle with olive oil and season with salt and pepper. Grill, turning occasionally, until shrimp is opaque and lemons slightly charred, 4 to 5 minutes.

  • Brush with pesto and serve.

Recipe Via: Delish

10 Steps to Follow for Bike Safety

Biking is a prominent hobby, mode of transportation and exercise in the Athens area. On any given day, the streets are peppered with students pedaling to class, professionals biking to the office and cycling enthusiasts training for their next big race. Hopping on your bike for a leisurely ride sounds great, but there are several safety factors to consider before you head out for the day. More children ages 5 to 14 go to the emergency room after a biking accident than with any other sport. Whether you are mountain biking with friends, or out for a few hours of fun with the family, we have compiled 10 steps to follow for bike safety.

  1. Wear a helmet!- Wearing a properly fitted helmet is the best way to prevent head injuries. Helmets can reduce the risk of head injuries by almost 45 percent and reduce the risk of severe brain injuries by 88 percent. Make sure your helmet has a sticker declaring that it meets the standards of the Consumer Product Safety Commission (CPSC).

  2. Adjust your bike to fit- Make sure the bike fits each rider well. It should be comfortable and your feet should be able to touch the ground when sitting on the seat.

  3. Ride ready- Check working parts of bike regularly or before each ride. Check brakes and wheels; make sure that “quick release” wheels are secure. Oil the chain, check tire air pressure, and make sure that the seat and handlebars are tight.

  4. Go with the flow- Go with the flow and follow bike rules. Mountain bike paths usually have a one-way pattern to follow for bikers safety. Most park bike paths follow the “stay to the right” rule on the pathway. Make sure to be considerate of other bikers.

  5. Act like a car- When street biking, act like a car and follow all traffic laws and lights. It is important to know and use hand signals to notify drivers of your intentions.

  6. Be alert- Stay alert and don’t get distracted. Keeping an eye out for obstacles can help prevent bike accidents. Listening to music or talking on the phone will distract even the best cyclist.

  7. Ensure your visibility- Make sure you are visible to all car drivers and other bikers. Wear bright colors and use lights and reflectors on your clothes and/or bike. Take extra precautions when riding at night or early in the morning. Be cognizant that sunlight in driver’s eyes may prevent them from seeing you.

  8. Don’t hurry- Travel at safe speeds, and yield to faster riders. Move off the road or pathway when you’re stopped.

  9. Use the buddy system- Ride with a buddy and stick together. Not only is safety in numbers smart, but it could be the difference-maker in a driver seeing you on not. Having a riding partner also ensures quick help in the event of an accident.

  10. Dress to impress- And finally, wear appropriate clothing. Make sure that nothing will get caught in the bike chain-like loose pant legs or shoelaces. Proper shoes are important to grip the pedals and protect the feet.

We hope that these steps have enlightened you and help you enjoy your next ride. Biking should enhance your well-being, not endanger it. Be safe, and ride on!